Last updated: Mar 2026
It is the single most frustrating experience in modern gaming. You are lined up for the perfect shot in GTA VI or navigating a tight platform in a cozy indie game, and your character suddenly veers left, unprompted. Your camera spins uncontrollably. Your crosshairs wander.
You have Controller Drift, also known as analog stick drift, and it’s a plague affecting millions of DualSense (PS5) and Xbox Series X/S controllers.
In 2026, as games demand more precision, the tolerance for this mechanical failure is zero. If you are tired of your hardware fighting you, this is the only guide you need. We will break down what causes drift, how to diagnose it, and the definitive, step-by-step methods to fix your PS5 and Xbox controllers, ranging from 10-second software tweaks to professional hardware solutions.
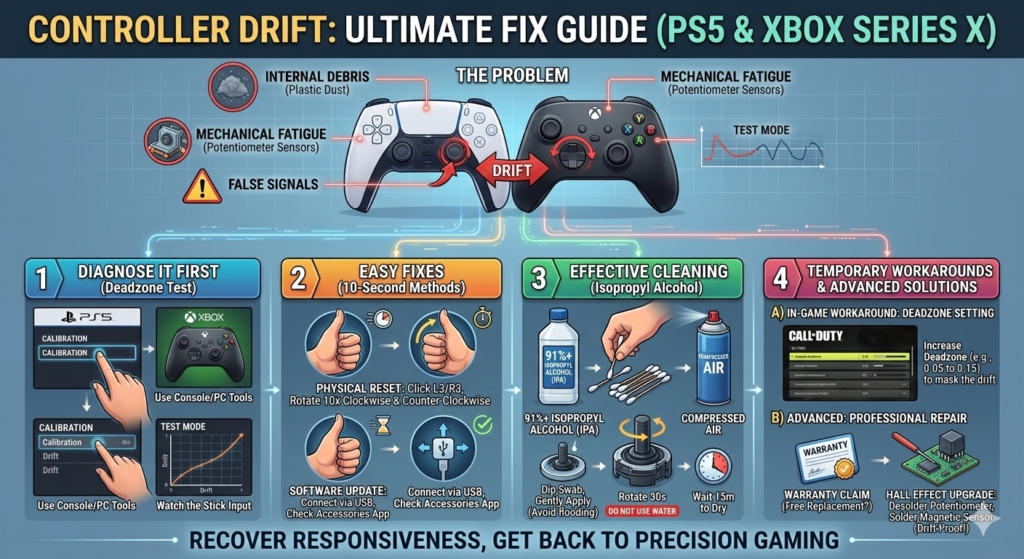
1. What is Controller Drift and Why Does It Happen?
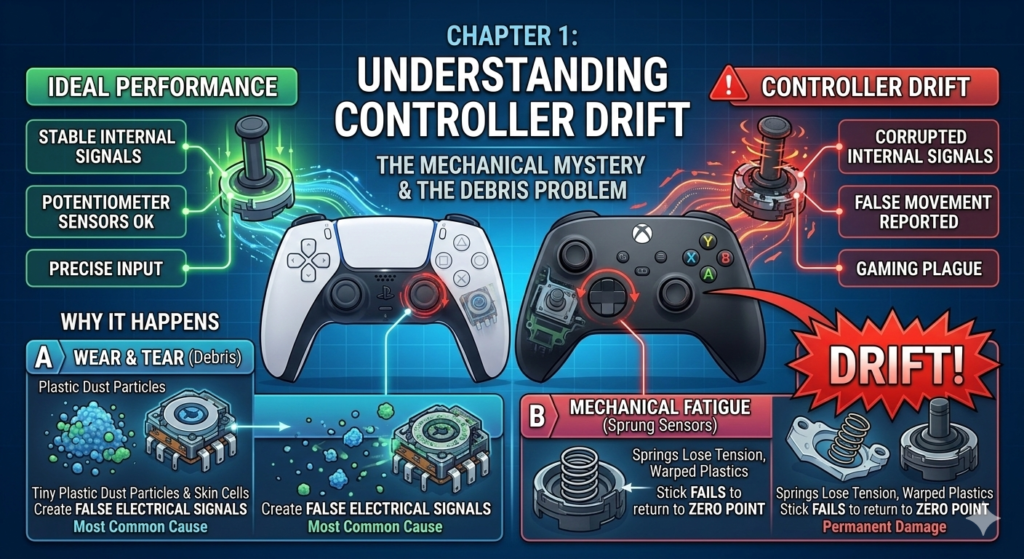
Before you can fix the problem, you need to understand it. Inside every standard DualSense and Xbox Series X controller are mechanical components called potentiometers. These components measure the position of the analog stick.
Drift occurs when these sensors report movement to the console even when you are not touching the stick. In 2026, the two primary causes remain:
- Wear and Tear (Debris): This is the most common cause. Over hundreds of hours of gaming, friction between the plastic stick and the sensor housing creates tiny plastic dust particles. This dust, combined with skin cells and sweat, gets trapped inside the potentiometer, creating false electrical signals.
- Mechanical Fatigue (Sprung Sensors): Potentiometers use tiny metal springs to help center the stick. Over time, these springs lose their tension, or the plastic mechanics warp slightly, meaning the stick physically fails to return to the absolute “zero point.”
The 2026 Game Changer: Hall Effect Sensors
By 2026, the industry has largely begun transitioning to Hall Effect sensors in high-end, third-party controllers (like those from 8BitDo or Scuf). Unlike potentiometers, Hall Effect sensors use magnets to measure position, meaning zero physical contact and, therefore, zero mechanical drift. If you are using a base DualSense or Xbox controller, however, you are still on potentiometers.
2. Preliminary Step: Diagnose the Drift (The “Deadzone Test”)
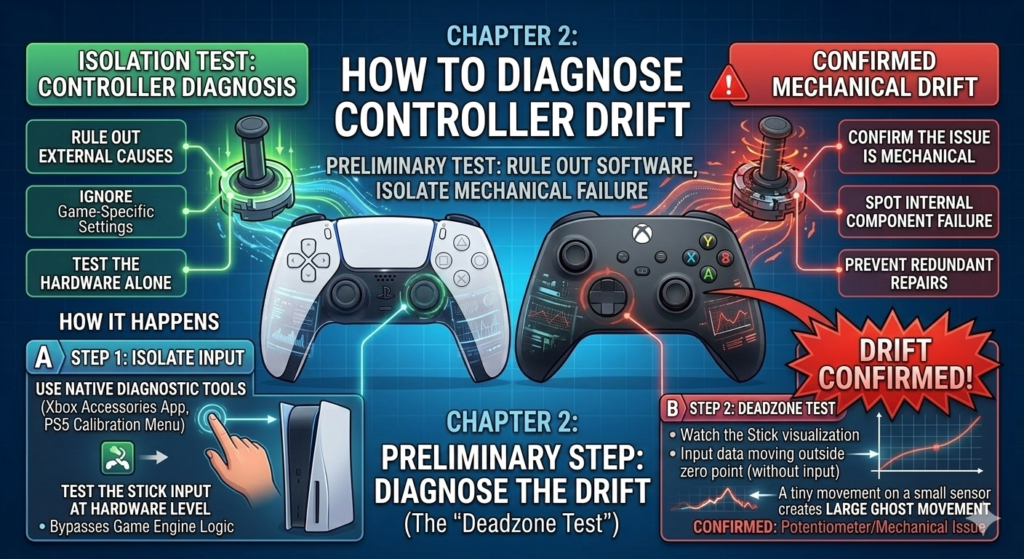
Is it the game, the console, or the controller? Before trying any fixes, confirm the drift is mechanical. In 2026, both Sony and Microsoft have integrated advanced diagnostic tools.
For PS5 (DualSense):
- Navigate to Settings > Accessories > Controllers.
- Sony introduced a native calibration tool in 2025. Access the “Calibration” menu. It will show a live visualization of your left and right sticks. If the dot moves outside the center circle without input, you have drift.
For Xbox Series X/S:
- Open the Xbox Accessories App (either on the console or PC).
- Select your controller and go to “Test Mode” (the lab icon). Watch the stick input data. Movement outside the deadzone confirms the issue.
3. Five Methods to Fix Controller Drift (from Easiest to Hardest)
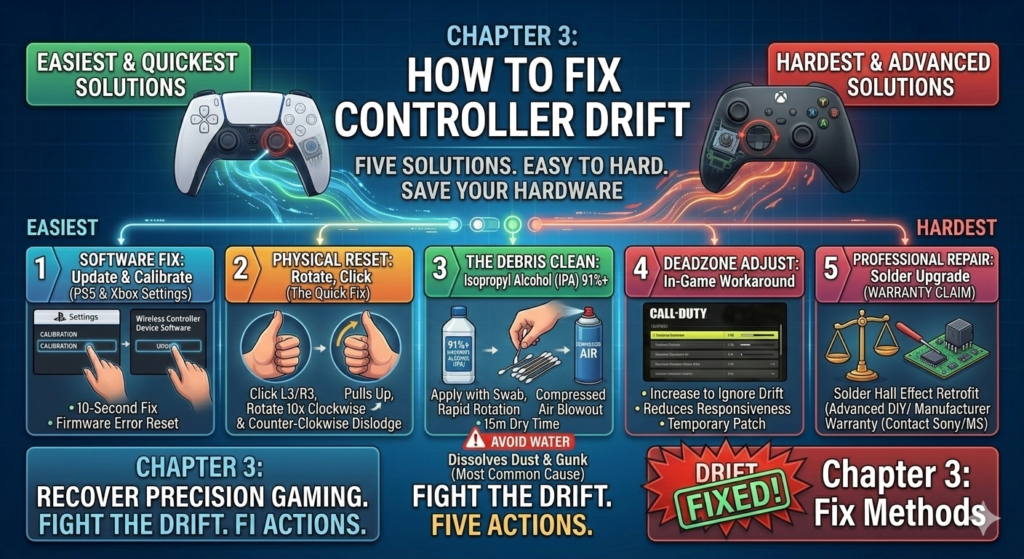
We have organized these solutions by difficulty. Start with Method 1 and only progress if the drift persists.
Method 1: The Software Fix (Update and Calibrate)
Sometimes drift is a temporary logic error in the controller’s firmware.
- PS5 Fix: Connect your DualSense via USB. Go to Settings > Accessories > Controllers > Wireless Controller Device Software and update. Once updated, use the new 2026 “Recalibrate Analog Sticks” feature in that same menu.
- Xbox Fix: Connect via USB and open the Xbox Accessories App. Update the controller. If available, use the “Recalibrate” function introduced in late 2025 to re-center your stick’s zero point.
Method 2: The Physical Reset (The Quickest Fix)
This simple action can unstick physical debris without opening the device.
- Locate the drifted analog stick.
- Gently press the stick down (the ‘L3’ or ‘R3’ button) and hold it.
- While holding it down, slowly rotate the stick clockwise 10 times, then counter-clockwise 10 times.
- Release the button, then gently pull the stick upwards as far as it will go without popping off, and repeat the rotations.
- Test the controller. This often dislodges minor dust buildup.
Method 3: The Deep Clean (Isopropyl Alcohol)
This is the most effective software-free fix and resolves over 70% of drift cases. Potentiometers are designed to be cleaned with alcohol.
- What You Need: 91% or higher Isopropyl Alcohol (IPA), cotton swabs (Q-tips), a can of compressed air. Do NOT use water or lower-concentration alcohol.
The Process:
- Turn OFF the controller completely and disconnect it.
- Locate the gap at the base of the drifted stick.
- Dip a cotton swab in the alcohol. Gently press it around the base of the stick, allowing the alcohol to seep down into the mechanics. Be generous, but do not flood it.
- Rapidly rotate the stick in all directions for 30 seconds to work the alcohol into the potentiometer sensors.
- Press down (L3/R3) and blow compressed air into the gap to blow out the dissolved debris.
- Crucial Step: Wait a full 15 minutes for the alcohol to completely evaporate before turning the controller on. Alcohol evaporates quickly and is non-conductive, but patience is key.
Method 4: Adjusting In-Game Deadzones (The Temporary Workaround)
If the drift is minor and physical cleaning didn’t help, you can bypass it in software.
- How it Works: All competitive games in 2026 (like Call of Duty, Apex Legends, or GTA VI Online) feature a Deadzone setting in their controller options. This setting tells the game to ignore any input within a certain radius of the center.
- The Fix: Increase the deadzone (e.g., from 0.05 to 0.15) for the drifting stick. Keep increasing it until the character stops moving. Note: This slightly reduces responsiveness, so it is a temporary patch, not a true cure.
Method 5: Professional Repair or Replacement (The Nuclear Option)
If Methods 1–3 failed, the potentiometer springs have failed mechanically. You have two choices:
- Warranty Claim: If your controller is less than one year old (or you live in a region with 2-year mandatory electronics warranties), contact Sony or Microsoft directly for a free repair or replacement. This is always the best path.
- Hall Effect Retrofit (For Pro Gamers): In 2026, many independent repair shops (and some DIY kits) offer to desolder your drifting potentiometers and replace them with magnetic Hall Effect sensors. This costs about $30–$50 but creates a “Drift-Proof” controller that will likely never drift again. Only attempt this yourself if you have advanced soldering experience.
Conclusion: The Ultimate Guide Summary
Controller drift is frustrating, but it is rarely fatal in 2026. If your PS5 DualSense or Xbox Series X controller starts fighting you, stay calm and follow the sequence:
- Start with diagnostics to confirm the issue.
- Update and recalibrate in the settings.
- Perform a physical rotation reset.
- Do a deep clean using 91% Isopropyl Alcohol.
- Use in-game deadzones as a workaround.
- If all else fails, claim your warranty or consider a professional Hall Effect upgrade.
By following these steps, you can save your expensive hardware and get back to precision gaming. Good luck!